
Canon 640, 645, 660 series and similar ink cartridges - How to refill
Canon ink cartridge - refilling steps...
1) Remove the empty Canon ink cartridge from printer and remove the label. If you have trouble peeling it off, lift a corner using something sharp first.
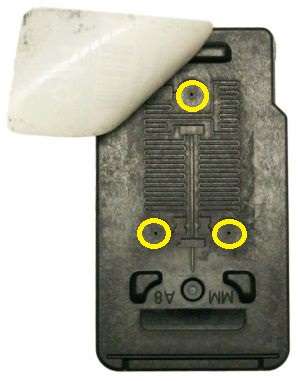
This should expose one to three miniature hole(s) in the top casing. There is one hole in the black and three in the colour cartridge. Each hole is connected to a separate colour ink reservoir inside and serves as an air vent for it. Same holes can also be used to add ink.
Following pic is a Canon CL-641 colour cartridge with label peeled back.
See the holes?
2) The air holes are too small to fit a filling needle through, so have to be enlarged first. Few clockwise turns using a hand drilling tool (like this)..and you have a neat filling hole.
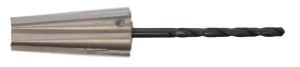
Note: The drill tool is supplied with Inkbank refill kits or you can order one separately.
Find refill kit for your Canon cartridges:
| 510/511 | 645/646 | 660/661 |
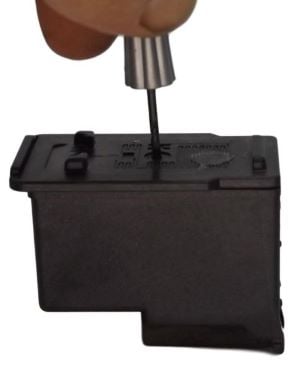
This is a pic of a PG-640 black ink cartridge being drilled.
3) Work out which colour ink goes into each hole (if filling a colour). The cartridges in pics below are PG-510 and CL-511, but the same colour positions are used with all Canon cartridges of this type.
Pic of black and colour cartridge fill holes:
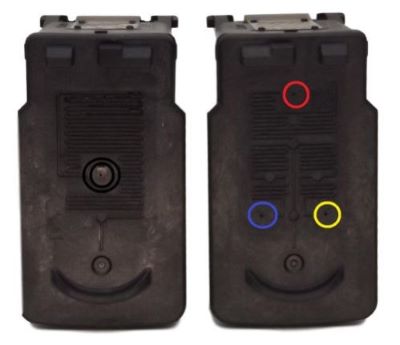
Black Colour
4) Securely attach a sharp needle to a syringe and fill it with ink by using the syringe in reverse (drawing on plunger). How much ink depends on the cartridge volume, how empty it is and what condition the internal sponge is in. For completely empty cartridges, use up to:
| Black cartridge | ml | Colour cartridge | ml |
|---|---|---|---|
| PG-37 | 3-4 | CL-38 | 1-2 |
| PG-40 | 6-8 | CL-41 | 2-4 |
| PG-50 | 8-10 | CL-51 | 4-6 |
| PG-510 | 3-4 | CL-511 | 1-2 |
| PG-512 | 6-10 | CL-513 | 3-4 |
| PG-640/660 | 4-6 | CL-641/661 | 1-2 |
| PG-640XL/660XL | 8-12 | CL-641XL/661XL | 2-4 |
| PG-645 | 3-5 | CL-646 | 1-2 |
| PG-645XL | 6-10 | CL-646XL | 2-3 |
4) Insert needle inside the correct fill hole. You should feel some resistance as it enters the internal sponge. Push it in another 5mm or so and slowly inject the ink. Don't rush it and don't inject more han suggested !
Canon ink cartridges are not meant to be filled all the way to the top - unless XL or high yield version (eg. PG-40/50/512, CL-41/51/513) and may accept less ink than indicated above.
If the ink is overflowing or leaking out the bottom - you've put in too much!
Tip: Pausing injecting and inspecting the printhead (metal or plastic strip on underside) after every few ml injected, is the best way to avoid overfilling. The cartridge sponge can only hold so much ink and any excess will leak out - through the printhead. So...if you check the printhead during and after adding ink, you should see it starting to leak and know when to stop adding ink. Then suck 1 ml or so of the leaking ink colour (or until the leak stops) back out using the syringe.
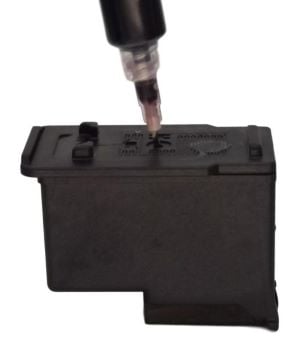
Pic of a black cartridge being filled
5) When finished filling (all colours if doing a colour cartridge), turn cartridge upside down over a sheet of paper towel folded 2-3 times and GENTLY tap the cartridge against it few times - to drain any excess ink out. Keep tapping - until no more ink drips out the fil hole(s).
All that's left to do now is clean the cartridge up with a damp tissue or cloth (if inky) then fit it back in the printer.
Note: If the cartridge had stopped printing earlier with: 'Ink level can not be recognized' support code, it should display the same message now. This is normal. To make the printer work, there's one more step to complete - disable the printer ink monitoring.
Don't fit a leaking cartridge in printer hoping it will stop leaking! It will, but only
after all the excess ink drains out into the printer. And the leaked ink will not only make a mess, but can also cross over and contaminate the other ink colours. So don't!
Don't leave cartridge sitting on paper towels (upright) after filling. The paper towel will wick all the ink out - if left long enough.
Don't seal the fill holes after filling! They must stay open !!!
Tip: You can replace the top label if you loke, but there is no need to. The cartridge will work perfectly well without it.
Note: A Canon cartridge (of this type) leaking after refilling is never caused by the fill holes left open or missing the top label. Excess ink is by far the most likely problem.
Need more info? Contact us


